Many Laravel apps ask for a VPS because they need Node, Redis, a queue worker or a build step on the server. Stocky POS asks for none of those. It is a Laravel app with a Vue front end, and the front-end assets ship already built. So an ordinary cPanel shared hosting account is enough to run it.
In this post we will install it from zero, step by step. We use Stocky POS as the example because it is the app we know best. The first five steps are the same for most Laravel apps on shared hosting: the right PHP version, an empty database, the files, a document root that points to public/, and the permissions. The installer part is specific to Stocky.
What You Need
Let’s take a look at what the server must have before we start:
- PHP 8.2 or newer. Versions 8.2, 8.3 and 8.4 are supported.
- MySQL 8.0 or newer, or MariaDB 10.6 or newer.
- Apache with mod_rewrite, or Nginx.
- PHP extensions: bcmath, ctype, curl, fileinfo, gd, json, mbstring, openssl, pdo, pdo_mysql, tokenizer, xml and zip.
- Memory: set the PHP
memory_limitto 256 MB. Big imports and PDF exports are what use it. - HTTPS, if you plan to scan barcodes with a phone camera or install the PWA. Browsers only offer those two on secure pages. The rest works without it.
You do not need SSH, Composer, npm or phpMyAdmin. The installer checks every extension and names the missing ones, so you can also just start and see.
Step 1: Set the PHP Version
In cPanel open MultiPHP Manager (some hosts call it Select PHP Version), choose your domain and set PHP to 8.2 or newer. While you are there, look at the extensions list. Control panels differ from host to host, so if you cannot find the option, ask your host’s support to switch the version for you.
Step 2: Create an Empty Database
Open MySQL Database Wizard. Create a database, create a user, and give that user all privileges on the database. Write down the database name, the username and the password. We need them in the installer.
One thing about cPanel: it puts your account name in front of the database name, for example cpuser_stocky, and it does the same for the database user. In the installer type the full name, prefix included.
Do not import anything. Stocky creates every table by itself, so the database must be empty.
Step 3: Upload the Files
Open File Manager, upload the application ZIP to the folder where the app will live and press Extract. Everything is included, so you do not run composer install or npm.
Step 4: Point the Domain at public/
Now the tricky part, and the one people skip. Stocky is a Laravel app, and only the public folder should be reachable from the web. Look at the folders we have after extracting:
stocky/
  .env
  storage/
  bootstrap/cache/
  public/      <- the domain must point here
If your domain points at the stocky folder itself, anyone can download .env. That file holds your database password and the application key.
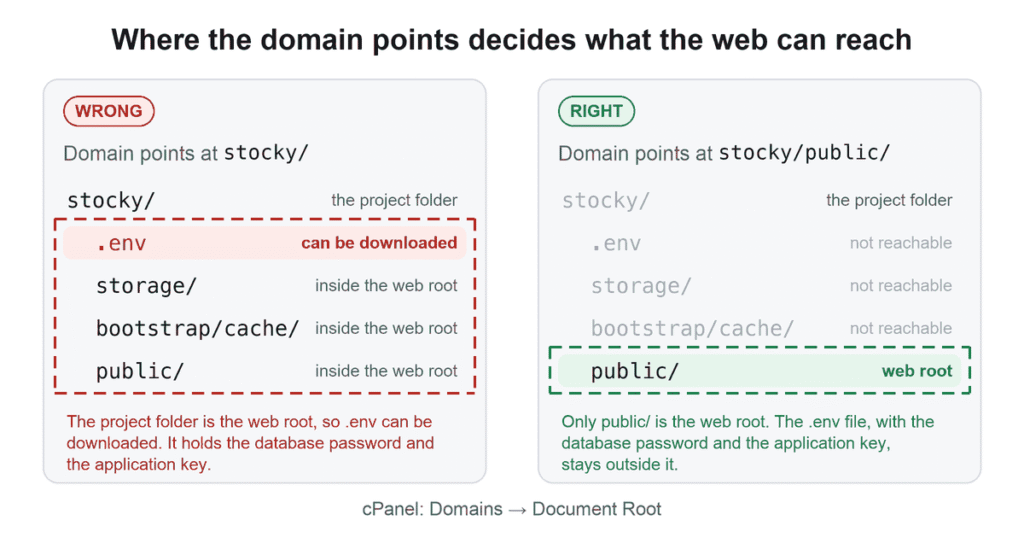
In cPanel go to Domains and change the Document Root of your domain or subdomain to the public folder. For example public_html/public if you extracted the app into public_html, or stocky/public if it lives in its own folder.
Some hosts do not let you change the document root. For that case Stocky ships an .htaccess and a server.php in the project root, and they send every request into public/. It works, but changing the document root is the cleaner fix.
Step 5: Check the Permissions
The installer writes .env, and the app writes uploads, so these must be writable:
.envstorage/bootstrap/cache/public/images/
Folders at 755 and files at 644 is the normal setting. File Manager shows the permission of each item, and you can change it there.
Step 6: Run the Installer
Now let’s run the installer. Open https://your-domain/setup in the browser. Stocky installs itself in four screens.
Screen 1: Requirements
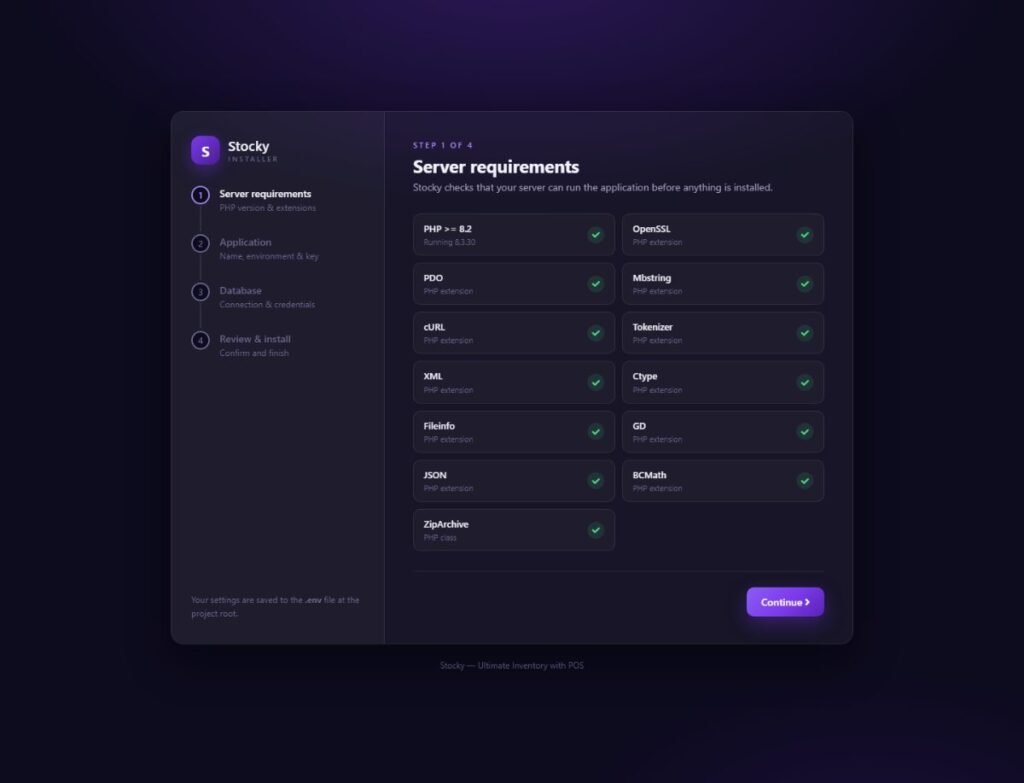
The first screen lists the PHP version, every extension and the ZipArchive class, and each one gets a green tick when it passes. You cannot continue until all of them pass. If something is missing, switch it on in your hosting panel and press Re-check requirements. The installer has not written anything at this point.
Screen 2: Application Settings
Here you set five things: the application name, the environment, debug mode, the application key and the application URL. For a live shop choose Production and turn debug Off. Press Generate to create the key. Type the URL the way visitors will, with https://. Everything on this screen is saved to .env, so you can change it there later.
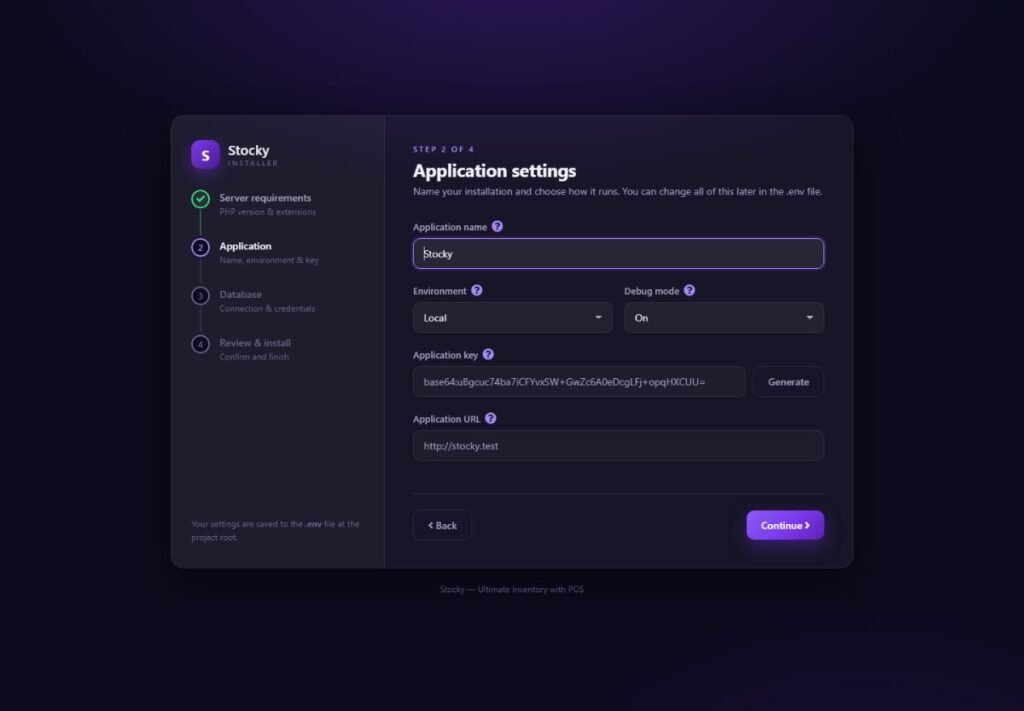
Screen 3: Database
Enter the host, port, database name, username and password from Step 2. Press Test connection. The Continue button only appears after the test passes.
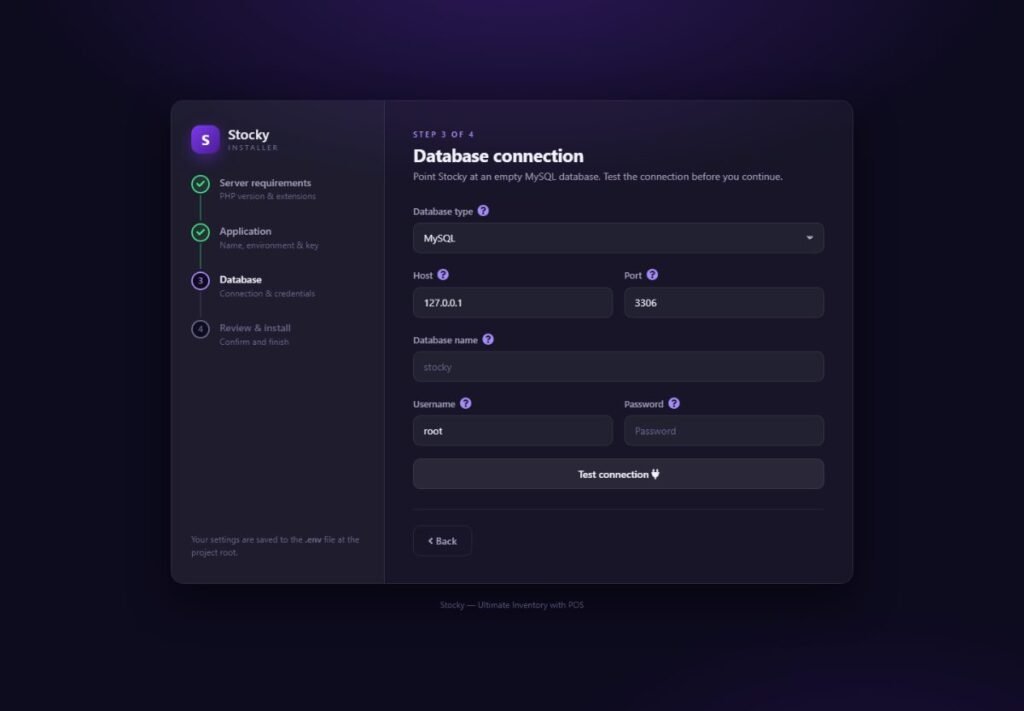
Screen 4: Review and Install
Read the summary and press Install Stocky. Now the installer does the real work. It writes .env, builds the tables and fills in the starting data: the Owner role with its permissions, a default warehouse, currencies, payment methods, settings and the translations. On a slow host this can take a few minutes, so leave the tab open until it finishes.
The last page gives you the administrator account that the install created. Sign in with it and change the password and the email at once.
Step 7: Make Sure /setup Is Closed
When the install finishes, the installer seals itself. After that, every /setup address answers 403. The seal is just a file:
storage/app/public/installed
If /setup is ever reachable on a live site, check that file first. If it is missing, create it with any content and check the folder’s permissions.
Step 8: Set the Basics Before You Sell
Do these three things before the first sale, because they affect every document and report after it. Open Settings → System Settings:
- Company details. Whatever you enter here appears on your receipts and invoices: the company name, logo, phone, email and address.
- Timezone. It decides which date a late-evening sale lands on, and what time the scheduled jobs run.
- Default currency. Reports and stock values are all calculated in this currency. If you switch on multi-currency later, the other currencies are converted into it.
Then open Settings → Mail Settings, fill in your SMTP details and press Send test. Invoices, password resets and order confirmations all go through it. Many hosts only send mail from an address on your own domain, using port 587 with TLS.
Step 9: Add the Cron Entry (Optional)
Stocky works without cron. Sales, stock, receipts, the online store and the reports do not need anything in the background. One cron entry unlocks the scheduled work, such as the daily database backup and the WooCommerce sync.
In cPanel open Cron Jobs and add the line below to run every minute. If the default php on your host is older than 8.2, write the full path to a newer PHP instead.
* * * * * cd /path/to/stocky && php artisan schedule:run >> /dev/null 2>&1
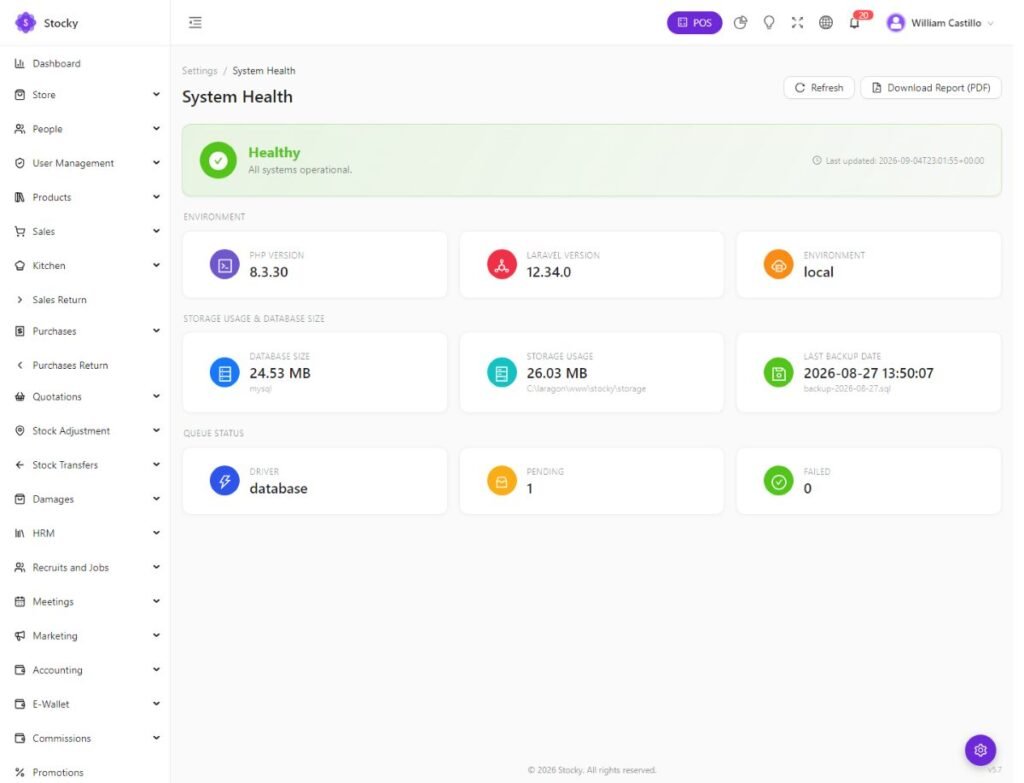
The queue driver is the database, so there is no Redis to install and no separate queue:work process. The scheduler drains the queue every minute. Without cron the queued jobs run while somebody uses the admin. That is enough for a small shop, but webhooks and syncs wait until the next visit.
To check that it works, open Settings → System Health and look at the queue. A growing number of pending jobs means the scheduler is not running.
If the Install Fails
Most failures are one of these. The installer message tells you which:
| The message mentions | What to do |
|---|---|
| Access denied for user | The database username or password is wrong. On cPanel check that you typed the prefixed username. Go back one screen and test again. |
| Unknown database | There is no database with that name. Create the empty database in cPanel first, then type its full name with the prefix. |
| Permission denied / failed to open stream | The installer cannot write to .env, storage/ or bootstrap/cache/. Fix the permissions as in Step 5, and make sure the web server’s user owns them. |
| Maximum execution time | The install ran longer than PHP allows. Raise max_execution_time to 300 and try again, or run the command-line install below. |
| Base table already exists | An earlier attempt stopped halfway. Empty the database, or drop its tables, and start the installer again. |
| A blank page or a 500 after Install Stocky | Set APP_DEBUG=true in .env to show the error, or open storage/logs/laravel.log. Set debug back to false when you are done. |
Problems After the Install
| What you see | Why, and what to do |
|---|---|
| A 500 error or a blank page | Open storage/logs/laravel.log, or Reports → Error Logs in the admin. The usual causes are a permission on storage/ or bootstrap/cache/, or a PHP extension that disappeared when the host changed something. |
| Pictures will not upload | Check that public/images/ is writable. Then check upload_max_filesize and post_max_size in PHP, because both must be larger than the file. |
| Emails do not arrive | Mail Settings has a test button. Use it, then check the sender address and the port, as in Step 8. |
| The camera scanner or the install button is missing | Both need HTTPS, and your site is on plain HTTP. Put an SSL certificate on the domain. |
| Pending jobs keep growing in System Health | The cron entry is missing, or it uses the wrong PHP. See Step 9. |
Prefer the Command Line?
If your host gives you SSH, you can skip the wizard. Write .env with APP_URL, APP_KEY and the DB_* values, then run:
php artisan key:generate
php artisan migrate --force
php artisan passport:install
php artisan db:seed --force

# tell the installer it has nothing left to do
echo 1 > storage/app/public/installed
These commands create the Owner role and the default administrator account. You can run the seeders twice and nothing is duplicated.
Backups and Updates
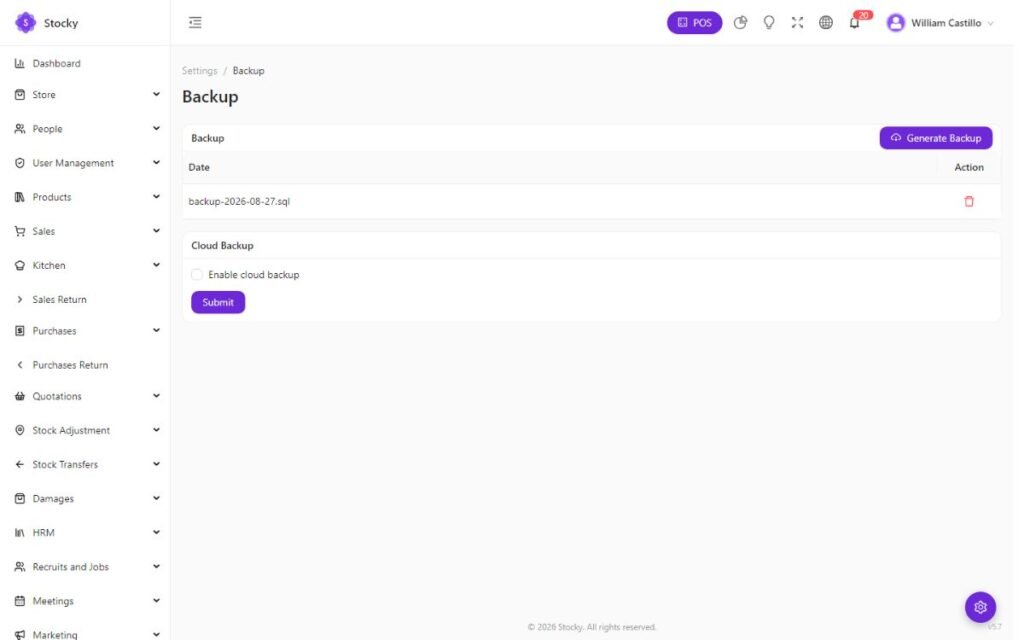
Two things to set up on day one. First, backups. Open Settings → Backup and generate a dump. The dump is the database only, so include public/images/ and storage/app/ in your file backup too. Cloud backup to Amazon S3 or Google Drive is built in, and a copy that stays on the same server is not a safe copy.
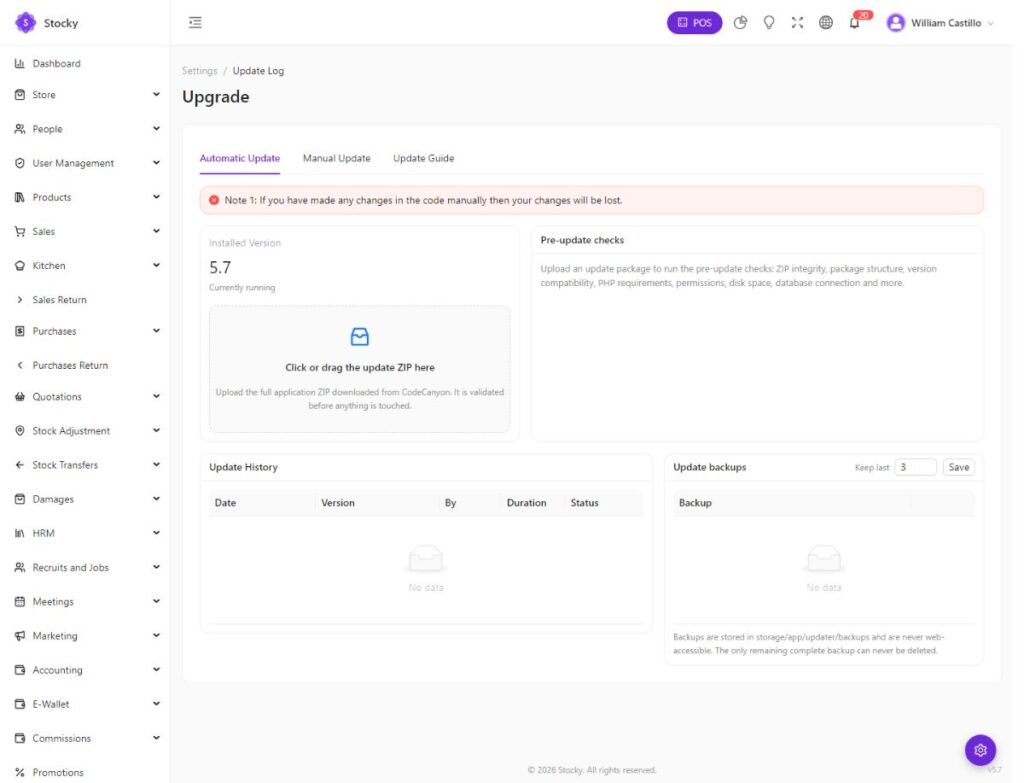
Second, updates. Settings → Update takes the new ZIP, runs checks on the archive, the PHP version, permissions, disk space and the database, then installs it. It backs up the files and the database first, and rolls back by itself if something fails. Make your own database backup before each update as well, even though the updater makes one. If your host does not let the updater write files, use the Manual Update tab.
Is Shared Hosting Enough?
For one shop, or a few, yes. A $10 a month hosting plan does the job for most installs. If you outgrow it, your data is in your own database, so you can move it to a VPS later. The multi-tenant edition, Stocky SaaS, is different: on shared hosting an admin creates each tenant by hand, so a VPS is recommended there.
Not sure about your host? Compare it with the shared hosting checklist and the server requirements, or send us its PHP version and extension list before you buy.
Stocky POS
Stocky POS is the app we installed here. It is a self-hosted point-of-sale and inventory system that you buy once and run on your own hosting. Open the Stocky POS page for the live demo and the licence options, or read the full installation handbook in the Stocky documentation.